

Scan Websites for Potential Vulnerabilities Using Vega in Kali Linux

Vega Vulnerability Scanner, a free, open-source, graphical web-auditing tool developed by the security company Subgraph. This tool contains several interesting features such as a proxy scanner, but we'll be focusing on the automated security testing aspect that can help us find and validate SQL injection, cross-site scripting (XSS), inadvertently disclosed sensitive information, and many other vulnerabilities.
Vega includes an automated scanner for quick tests and an intercepting proxy for tactical inspection. Vega can be extended using a powerful API in the language of the web: JavaScript. The official webpage is https://subgraph.com/vega/
Step 1 Install Vega
Vega is not included with Kali Linux v 2.0. As a result, it has to be installed. You can download the latest version at https://subgraph.com/vega/.
you can run the apt-get
command seen below in a terminal. You'll get a message saying it's
already installed if you do have it already, and if not, it will install
it for you.
apt-get update && apt-get install vega

Step 2 Start Vega
In Kali Linux, tools are automatically sorted into categories, so click on "Applications," then hover over the "Web Application Analysis" category, and click on "Vega." Depending on if you're using something like XFCE, a lightweight version of Kali, the Applications menu may look a bit different. You could also just search for "Vega" from the "Show Applications" screen.

Step 3 Configure Vega
After starting an application for the first time, I like to view the available preferences and options. In the top-left corner, click on the "Window" menu, then view the "Preferences," which I'll walk you through in the next two steps.
If you prefer to anonymize your Vega scans and proxy all connections, check the "Enable SOCKS proxy" option under General,
and enter a proxy address and port. If you're using Tor, enter the
default Tor address and port (127.0.0.1:9050). This will help conceal
the origin of your scans. Otherwise, if you're using a free or premium
proxy service, choose the address and port you prefer.


Step 4 Scan a Website with Vega
Now that we have Vega installed and configured, we're now ready to start
scanning a website. To start scanning, open the "Scan" menu in the top
left and click on "Start New Scan." Vega will prompt us with the Select a Scan Target window. Enter your target URL into the box under Scan Target, then hit "Next."


By default vega vulnerability scanner will scan for lots of different vulnerability types.

Header Injections.This is just the first page of the modules section, there are quite a lot to choose from!
Directory Traversal Attacks.
URL Injection Attacks.
XML Injection Attacks.
XSS Injections.
Blind SQL Injections.
Shell Injection Attacks.
Remote file include Attacks.
String Format attacks.
OS Command Injection Attacks.
Check all the boxes of the modules you want to be controlled. Then, click “Next”.

Step 5 Interpret Vega's Alerts
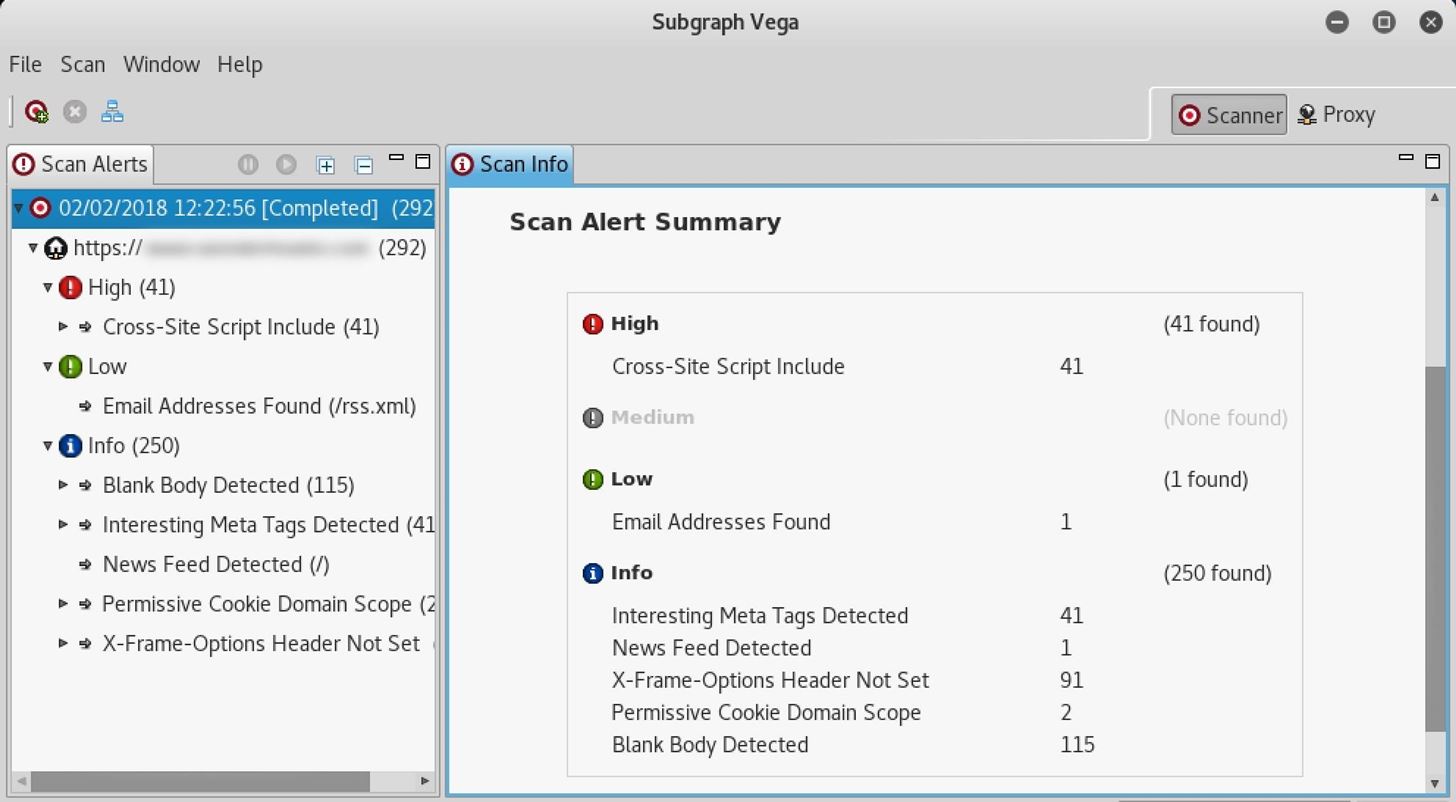
After the scan is completed, on the left down panel you can see all the findings, that are categorized according to the severity. If you click it, you will see all the details of the vulnerabilities on the right panel such as “Request”, ”Discussion”, ”Impact”, and ”Remediation”.
If Vega reports a "High" alert, don't panic. Vega's modules are sensitive and sometimes produce false positive alerts for vulnerabilities that may not actually exist. False positives aren't necessarily a bad thing. That being said, it's a good idea to comb through the report and manually investigate each alert. Think of these alerts as areas worth further investigating and not definitive indications that something needs to be fixed.
Clicking on one of the alerts will display tons of useful information.

Possible data inputs, such as cookies or request headers. Once they are found, Vega tries different inputs in them to identify vulnerabilities by analysing the responses and matching them to known vulnerable patterns.
In Vega, we can scan a site or a group of sites that are put together in a scope, we can select what tests to perform by selecting the modules we will use in the scan; also, we can authenticate the site or sites using identities (pre-saved user/password combinations) or session cookies and exclude some parameters from testing. As an important drawback, it doesn’t have a report generation or data export feature, so we will have to see all the vulnerability descriptions and details in the Vega GUI.
Vega is an excellent tool to help security researchers better understand web application penetration testing. Its vast selection of modules allows even novice users to dig deep into potential security risks and assess their severity to websites. Anyone interested in improving the security of their website and enhancing their web hacking skills will come to love Vega and its ease of use, or at least, I hope so.


This is such a great resource that you are providing and you give it away for free. I love seeing blog that understand the value of providing a quality resource for free. Pentesting Services
ReplyDeletePenetration Testing Services I would like to say that this blog really convinced me to do it! Thanks, very good post.
ReplyDelete